Hi Community,

Scenario : Age in the contact is calculated OOB based on the DOB

Question: How to add the age field in printable, as we off the existing Age field, “0” value is being printed in the printable


Like 0

Like

1 comments

Best route is likely to create a custom macro for the printable, you could pass it the DOB and it would return the age. See an example here: https://customerfx.com/article/creating-custom-macros-to-format-values-…

Ryan

Show all comments

Hi Community,

Scenario : For the approval action in the record page under case flow, it appears/ disappears on mouse hover the "approve", "reject" and "change approver" button

Question: Is there a option to have them fixed in the screen instead of mouse hover, so that the user can know that there is option to approve if they dont understand that they need to mouse hover on the screen to get the option 

Like 1

Like

1 comments

Hello Amritha,


The schema name that is to be modified is called ActionsDashboardItemContainer. Unfortunately, I was not able to find any examples of code that can change that functionality,


Best regards,

Bogdan

Show all comments

Hi Community,


Scenario : We have a added image to a section/detail. Post adding, we have an option to add another/delete the uploaded image


Question: Is there am option to zoom/view the uploaded the image, than view in the thumbnail size instead of increasing the image placement.

File attachments
Like 0

Like

1 comments

Hello Amritha,


You can try to take an example of code from OOB application. The schema name is BaseMessageHistoryItemPage that is placed in the Message package. The functionality is developed for the Case page and works in the following way - you just click on the picture that is placed in the Email or Portal message to enlarge it.


Best regards,

Bogdan S.

Show all comments

Hi Community,


When we download a printable, first the printable is downloaded and later we are manually clicking on the downloaded printable to view the content.


Question : is there a way on clicking of the printable, we open the pfd/word document instead of downloading it/parallelly the printable is downloaded and viewed instead of manually clicking on the downloaded document?

Like 0

Like

4 comments

Hi Amritha,


There is no option to preview or open the printable report without downloading the file itself. Theoretically, it is possible to develop custom preview of the report in the application, but it would be quite a complicated development task. Unfortunately, we do not have any examples of such implementation.

I will register your idea in our R&D team backlog, it might be available in future application versions.


Regards,

Dean

Dean Parrett,

Is is possible to open the downloaded printable automatically post downloading it instead of manually going to downloads and clicking on the downloaded printable?


Amritha Mayan Gorky,

Yes, but this question relates more to your browser. For example in Chrome, there is an option to open files of some certain type automatically after the download. After downloading the file, select Always open files of this type option. Next time when downloading Word file, like in my case, it will be opened automatically.


Regards,

Dean

Hi Lori Keller,


We have already registered the idea for our R&D team to implement this functionality in further releases. I will assign your case to this project in order to increase its priority.  

Show all comments

Hi Community,


We are trying to add new contact via Email but there are few fields which are made mandatory in the contact section and without those field values, contact is not being created.


For Eg: the “Type” field is mandatory in the contact section but in the email even if we select enrichment from the incoming email, we won’t get that data for the "type" field. 


Question : In that case, what can be done to add the mandatory fields also while adding a new contact from an email?


Like 0

Like

1 comments

Hi Amritha,


You can use this option when adding a contact upon record creation and then choose the contact type manually:

Also you can set some value for the contact type as a value by default in the "Contact" object settings for the "Type" column:

And as a result the contact will be automatically created with the "Type" column value being filled in.


These two approaches are easier than replacing the ContactEnrichmentSchema, adding the ContactType attribute and column into the modal window that is opened when enriching the contact.


Best regards,

Oscar

Show all comments

Hi Community,

We are trying to add a inline editing/adding of data for a detail. With the academy link : https://academy.creatio.com/documents/technic-sdk/7-16/adding-detail-editable-list , was able to add the editable list. But the number of fields in the detail is more than 8.  As we can’t have a editable for tiles view.


Is there a way to add more column in "select fields to display" and How can I add horizontal to this "select fields to display" in the settings page?


Also, how to add horizontal scroll in the mail detail page to scroll and add content if there are more columns?

Like 3

Like

1 comments

Hello Amritha,


To add more columns to the "Columns setup" they should be added to the detail object directly and then they will become available in the "Columns setup". Starting from 7.16.4 horizontal scroll in the column setup is available out-of-the-box so please update your app to 7.16.4 to get needed functionality without additional development. As for adding the scroll to the main detail - I am not sure if it is possible since properties like "overflow-y" or "scroll-padding-top" are CSS properties that can be theoretically added to the grid wrap of the detail data grid, but it would be easier to use the "Show more" option at the bottom of the detail rather than developing custom CSS and connecting it as a separate module to the detail schema.


Best regards,

Oscar

Show all comments

Hi Community,

I am trying to create a new lead and qualifying it, to create a new contact & account but when i am trying to create another lead with the same account name and contact name, later qualifying it.  Duplicate contact and account is getting created via the OOB lead management and lead qualification process, is it possible to link it to the existing account and contact.


Scenario: 

1.We create a new lead providing all the mandatory field data and later qualify the lead.

2. A new account and contact gets created and it is linked to the lead.

3. Create another lead with the same account name and contact name.

4. Qualify this lead also.

5. OOB process lead management and lead qualification process starts

6. It creates a new account and contact


Question : is it possible to link the lead to the existing account and contact instead of creating a duplicate account and contact.

Like 0

Like

1 comments

Dear Amritha,


You can modify the OOB business process and add a search for an existing contact - the process is called Lead qualification. Feel free to modify it according to your business tasks! Make sure to update the Lead management process system setting after a new version of the process is created. 


Best regards,

Angela

Show all comments

Question:

How do I clear the recipient list (audience) in a bulk email in the [Emails] section?

Answer:

Copy the bulk email. This will create a new bulk email record with the same template, but with an empty audience list. You can then choose a folder and add the audience once again.

Like 1

Like

Share

0 comments
Show all comments

Question:

How do I add a file located on a IIS server network to the [Attachments] detail? Will I be able to download it?

Answer:

This can be achieved by adding a link that looks like "file:///C:/Windows/" to the detail.

Please note that most browsers (Google Chrome and Firefox in particular) do not support direct localhost links (for safety precautions). To avoid this, disable the "WebSecurity" plugin in the additional browser settings. You can use the IE 11 browser as a workaround, but we do not recommend this because the security of your PC may be compromised.

Like 0

Like

Share

0 comments
Show all comments

Question:

How do I take the recipient's time zone into account during campaign execution?

Answer:

Marketing campaigns enable you to transfer participants to subsequent campaign steps at a certain time / frequency via the [Timer] element. Using this element in tandem with an outgoing sequence flow on the campaign diagram enables you to take into account the recipient's time zone. 

To do this:

1. Place the [Timer] element on the campaign diagram. Populate the element's properties with necessary values.

2. Connect the [Timer] element to a subsequent element(s) with a sequence flow.

3. In the sequence flow properties, select the "Set up filtering conditions" value in the [Which conditions must the contacts meet to transition to the next step?] area.

4. Click "+ Add condition". Select the following filter:

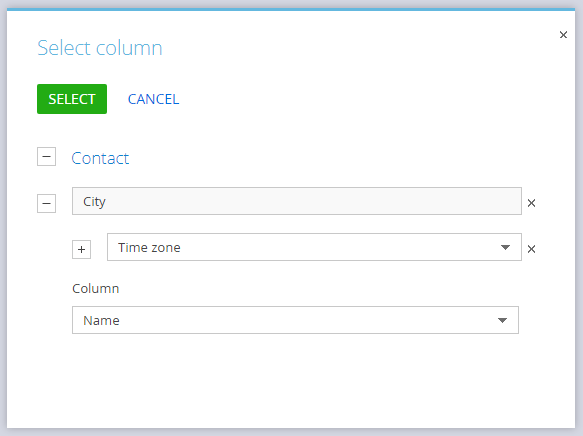
5. Specify additional filtering conditions: 

This way the participant will only be transferred to the next campaign step if their time zone is +2 (UTC +2). Always specify a double number in this filter. For example, if the time zone is "+2", type in "+02", or if it is "+4", type in "+04".

6. Add any other required elements to the campaign diagram and click [Save].

Please make sure that the time zones are specified in the "Cities" lookup, as they are pulled from cities specified in the recipient's contact record during campaign execution. 

Additionally, we recommend adding a conditional flow for those recipients that do not have cities specified in their contact record. 


Like 0

Like

Share

0 comments
Show all comments